BetterDuino

BetterDuino – MarcDuino Replacement Firmware
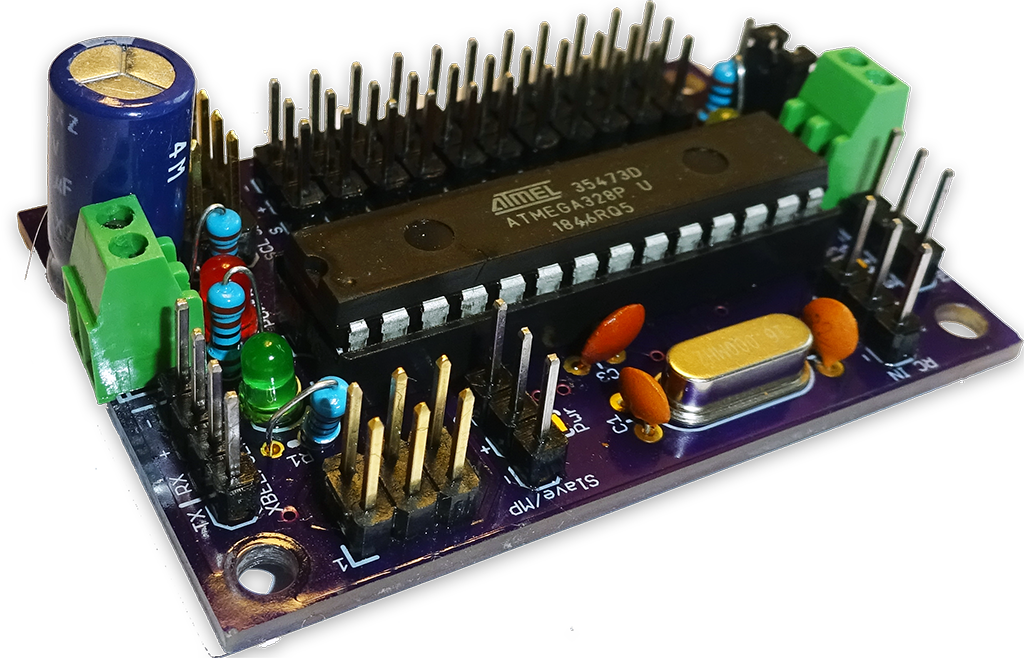
Although not a real AstroCAN-Module (yet), we decided to add the MarcDuino replacement firmware here, because it makes the ancient MarcDuino boards getting a “NextGen” flavor.

Important: The BetterDuinoFirmwareV4 software is a firmware replacement for the original MarcDuino V1.5Rev3 boards. BetterDuinoFirmwareV4 has nothing to do with the original firmware made by Marc nor with the spinoff made by Neil! So if you have any questions about BetterDuino Firmware V4 don’t ask one of them!

If you find any issues, please use the github “Issues” mechanism of the repository.

Further details about the boards can be found here:

https://www.curiousmarc.com/r2-d2/marcduino-system/marcduino-boards/marcduino-v1-5

https://astromech.net/forums/showthread.php?28414-Support-Thread-for-MarcDuino-v1-5-s

The original firmware can be found here:

https://www.curiousmarc.com/r2-d2/marcduino-system/marcduino-software-reference

There also is a spinoff of Marcs firmware also known as MarcDuinoMain V3 and MarcDuinoClient V3:
https://github.com/nhutchison/MarcDuinoMain

https://github.com/nhutchison/MarcDuinoClient

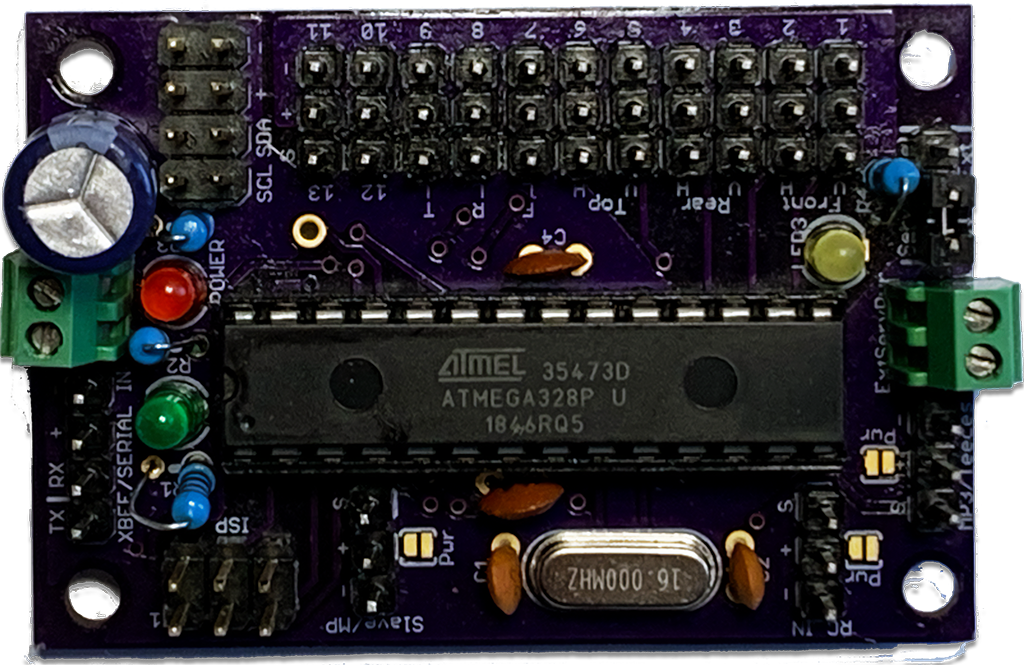
Connectors

1
2
3
4
5
6
7
8
9
10
11
1

Power Supply

Important: 5V ONLY! Otherwise you will damage your board.

!Check polarity!

2

Serial Connector

Interface for communication with board.

3

ISP-Connector

Connector for firmware flashing.

4

Slave / Magic Panel Connector

Either connects to Slave board or to Magic Panel. See MarcDuino instructions how to connect properly.

5

Remote Control Connector

Not supported by BetterDuino.

6

MP3 / Teeces Connector

Either connects to MP3 trigger board or to Dome Teeces. See MarcDuino instructions how to connect properly.

7

Servo Power Supply

Power Supply for Servo Ports. 6V max recommended

!Check polarity!

8

Servo Power Supply Jumper

5V – Servos are powered by main power supply

Ext – Servos are powered by separate Servo Power Supply

9

Servo / Holos Connector bar

Either connects to panel servos, holo servos or holo lights. See MarcDuino instructions how to connect properly.

BetterDuino support RGB-holos as an option.

10

I2C Connector

I2C Port for connecting other dome modules.

11

Atmel ATMEGA 328P Microcontroller

Module’s brain.

AstroCAN Bridge Connectors
HotspotFunctionDescription
1Power Supply, 5.0VImportant: 5V ONLY! Otherwise you will damage your board.

!Check polarity!

2Serial Connector Interface for communication with board. 9600,8,N,1
3ISP-Connector Connector for firmware flashing. See FAQ/HowTo for details.
5Remote Control ConnectorNot supported by BetterDuino.
6MP3 / Teeces ConnectorEither connects to MP3 trigger board (from Master) or to Dome Teeces (from Slave). See MarcDuino instructions how to connect properly.
7Servo Power SupplyPower Supply for Servo Ports. 6V max recommended.

!Check polarity!

8Servo Power Supply Jumper5V – Servos are powered by main power supply

Ext – Servos are powered by separate Servo Power Supply

9Servo / Holos Connector barEither connects to panel servos, holo servos or holo lights. See MarcDuino instructions how to connect properly.

BetterDuino support RGB-holos as an option.

10I2C ConnectorI2C Port for connecting other dome modules.
11Atmel ATMEGA 328P MicrocontrollerModule’s brain.

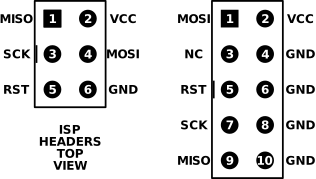
ISP

MarcDuino boards are using the 6-pin-connector. Pin 1 (MISO) is where the white corner mark is places on the PCB.

Commands

Use serial terminal to connect via Interconnect TX/RX to MarcDuino-Module. Communication speed ist 9600 baud. The following commands are available for configuration and management:

Settings

Use serial terminal to connect via Interconnect TX/RX to MarcDuino-Module. Communication speed ist 9600 baud. The following settings can be configured (see command set above):

F.A.Q – BetterDuino

What is the MarcDuino system?

(from https://www.curiousmarc.com/r2-d2/marcduino-system):

“The MarcDuino system controls the animatronics of an R2 (dome panels, light and sound). It currently controls 10 dome panels, an “MP3 Trigger” sound board, dome “Teeces” lights and holoprojectors light and movements, and I2C gizmos you can add-in yourself. It has lots of pre-programmed effects making all these act together.

The system is centered around the MarcDuino boards which sit in the R2. There are two kinds, the Master and the Slave board, which are very similar to each other.” – CuriousMarc

What is BetterDuino Firmware V4?

The BetterDuinoFirmwareV4 software is a firmware replacement for the original MarcDuino V1.5Rev3 boards.

Details about the boards can be found here:

https://www.curiousmarc.com/r2-d2/marcduino-system/marcduino-boards/marcduino-v1-5

https://astromech.net/forums/showthread.php?28414-Support-Thread-for-MarcDuino-v1-5-s

The original firmware can be found here:

https://www.curiousmarc.com/r2-d2/marcduino-system/marcduino-software-reference

There also is a spinoff of Marcs firmware also known as MarcDuinoMain V3 and MarcDuinoClient V3:
https://github.com/nhutchison/MarcDuinoMain

https://github.com/nhutchison/MarcDuinoClient

Why a Replacement Firmware for MarcDuino boards?

The last update to the original firmware was in 2018. Neil’s last update was a minor change in mid-2022. His V3 software has about 80% of the original source in common, adding some features for the latest MarcDuino boards (servo controllers and EXT/AUX pin controllers). He also added the nice feature of saving settings to EEPROM at runtime. But the code also has some glitches and bugs and is based on outdated Arduino libraries. I started 2023 after the whole Arduino framework and community has made really great progress in the last 5 years.

The BetterDuino Firmware V4 code has completely been rewritten from scratch. I took Neils idea of the EEPROM storage a step further, so nearly any setting is stored there. Including per-servo position settings. I also added the new panel animation of Tim Hebel who is also using a modified MarcDuino V3 firmware (https://github.com/Eebel/SHADOW_MD_EEBEL).

New Features (excerpt)

  • Support for MP3 Trigger, DF Mini Player and R2-D2 / Astromech Vocalizer (https://humancyborgrelations.com/)
  • Identical firmware for Master, Slave and Body
  • Automatic configuration of Master and Slave at first startup
  • per servo runtime settings for min/max and open/close positions
  • Support for Mr.Baddeley Dome MK4 (tiny panel)
  • switch to modern OOP software design and use of most recent common Arduino libraries
  • fixed a lot of bugs at least of the V3 spinoff
  • see https://github.com/RealNobser/BetterDuinoFirmwareV4/releases

Troubleshooting

BetterDuino does not execute any command

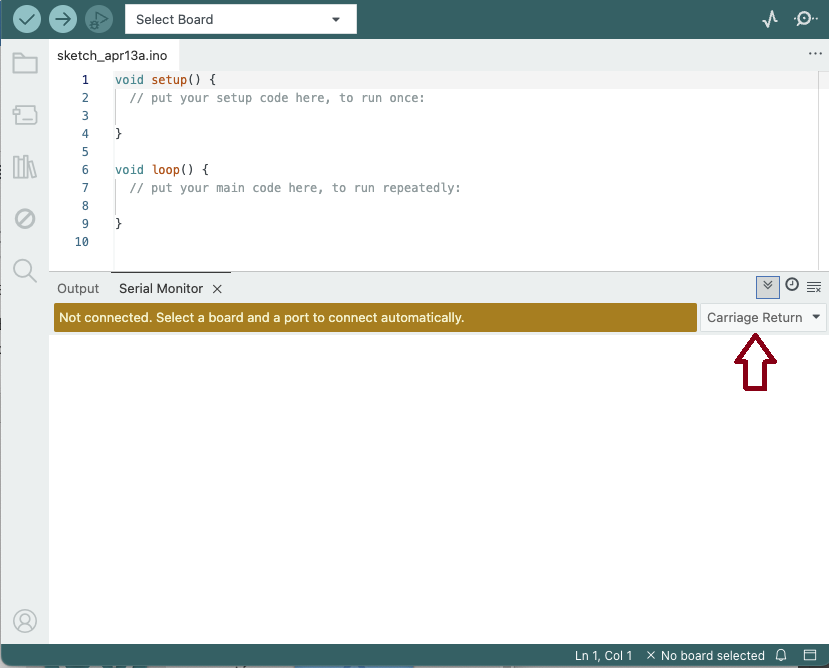
All MarcDuino and BetterDuino commands have to be send with Carriage Return as line ending, not Line Feed! So keep an eye on your terminal program configuration.

Most people are using the Arduino IDE serial monitor. Please check the following settings on the right (“Carriage Return”):

Best Practice – Flashing firmware

All Operating Systems

Firmware

First download the corresponding firmware version from https://github.com/RealNobser/BetterDuinoFirmwareV4/releases

If your are fine with building from source please read here first and setup an build your own firmware: https://github.com/RealNobser/BetterDuinoFirmwareV4?tab=readme-ov-file#building-and-uploading-firmware-using-visual-studio-code

Programmer

The MarcDuino board do not have a serial bootloader any more. So you have to us a so called ISP-Programmer to download the hex-Files to the microcontroller.

Recommended ISP-Programmer:

Windows Operating System

After setting up the programmer within your operating system, an very easy way of flashing the firmware is using the myAVR Prog Tool: https://shop.myavr.de/index.php?sp=download.sp.php&suchwort=DL112

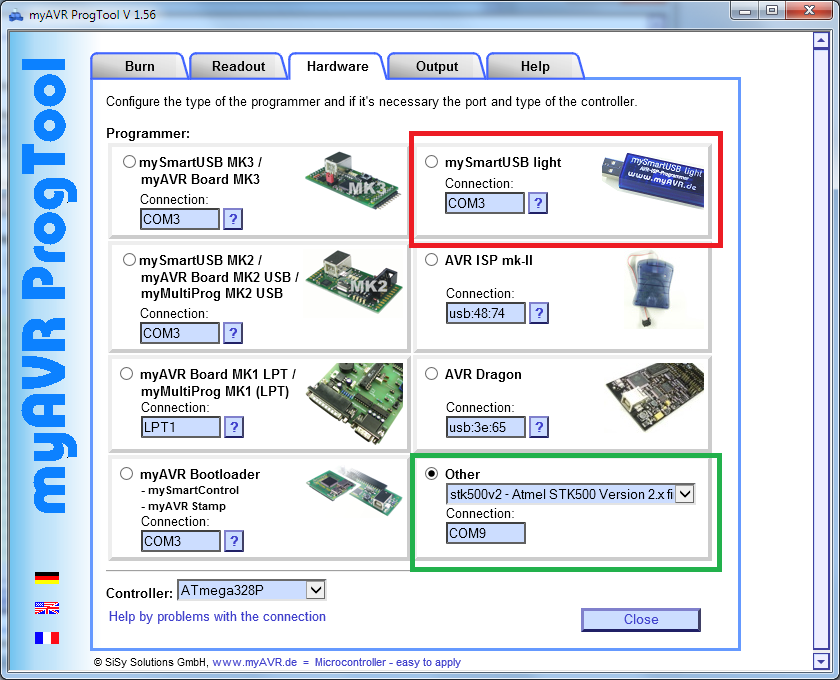
Configure the tool as shown in the picture:

  • When using the mySmartUSB light use the settings marked in red (com-Port might differ)
  • When using the Diamex Prog-S use the settings marked in red (com-Port might differ)

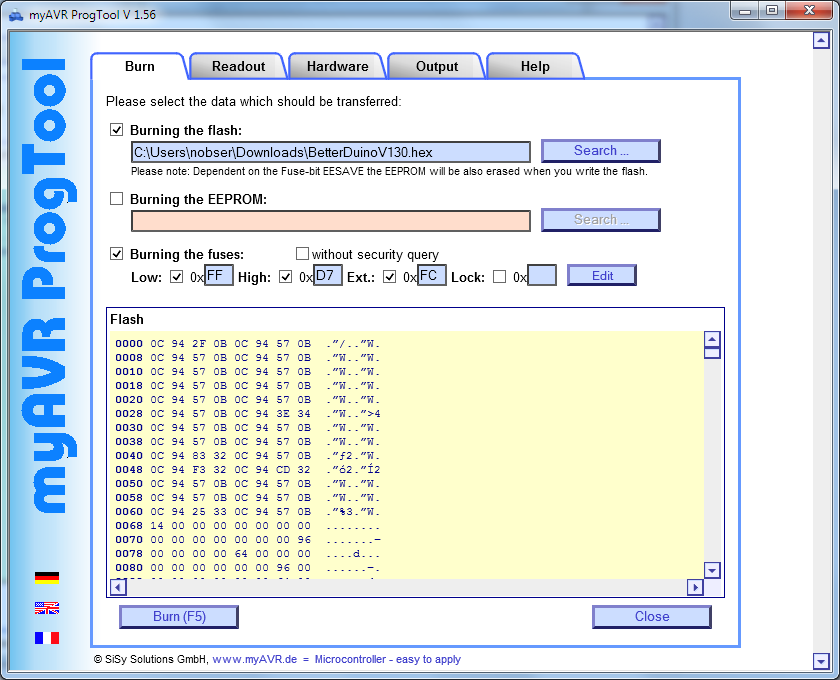
Flashing the firmware

Use the following settings to burn the flash. Fuse settings have to be set only at the first ever flash of the MarcDuino module. Please do NOT overwrite EEPROM, otherwise you will erase all you specific Astromech settings.

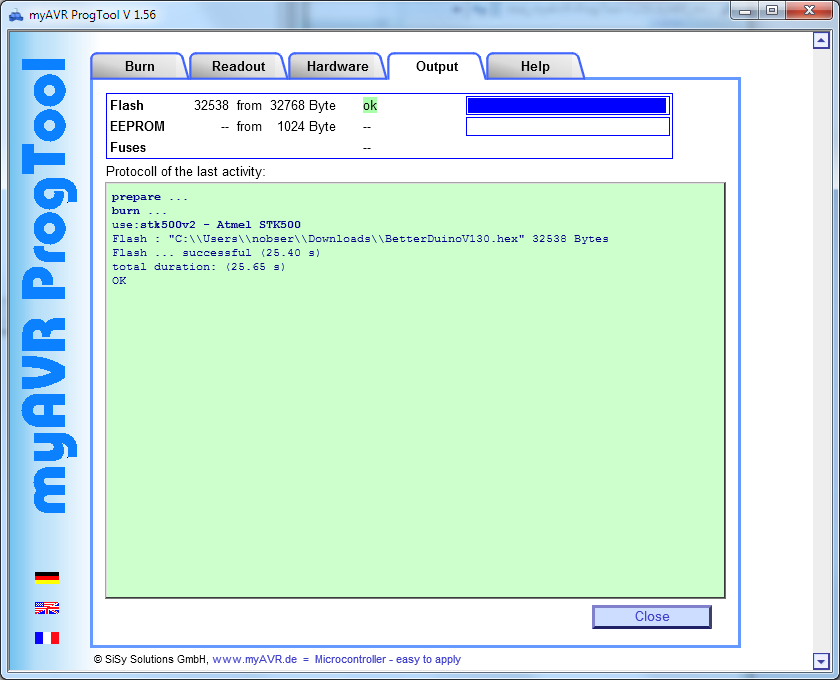
After successfully flashing the firmware you should see the following output:

Mac Operating System

avrdude is program also used by the original Arduino IDE. If you do not use VSCode with PlatformIO as described here ( https://github.com/RealNobser/BetterDuinoFirmwareV4?tab=readme-ov-file#building-and-uploading-firmware-using-visual-studio-code ), you have to get avrdude up and running on your operating system.

avrdude: https://github.com/avrdudes/avrdude

External HowTo: https://www.circuitschools.com/how-to-upload-a-hex-file-to-arduino-on-macos-using-avrdude/

Curious Marc original instructions: https://www.curiousmarc.com/r2-d2/marcduino-system/marcduino-boards/firmware-upload#h.p_vtlA3GDEWR8i

Linux Operating system

avrdude is program also used by the original Arduino IDE. If you do not use VSCode with PlatformIO as described here ( https://github.com/RealNobser/BetterDuinoFirmwareV4?tab=readme-ov-file#building-and-uploading-firmware-using-visual-studio-code ), you have to get avrdude up and running on your operating system.

avrdude: https://github.com/avrdudes/avrdude

Curious Marc original instructions: https://www.curiousmarc.com/r2-d2/marcduino-system/marcduino-boards/firmware-upload#h.p_vtlA3GDEWR8i