
AstroCAN Tech FAQ

CAN-Bus

What is CAN-Bus?

Short Version

A CAN bus is like a highway for electronic devices to talk to each other. Imagine you have many small computers in a car (like the engine, brakes, and radio). The CAN bus is the road that lets these computers send messages back and forth. This way, they can work together to make the car run smoothly.

Key points:

  • Messages: Devices send messages with information, like “the engine is running too hot” or “the door is open.”
  • Bus: The CAN bus is the shared “road” where these messages travel.
  • Nodes: The electronic devices connected to the CAN bus are called nodes.
  • Termination: Special resistors at the ends of the bus help to make sure the messages are clear.

Why is it useful?

  • Efficiency: It’s a very efficient way to connect many devices together.
  • Reliability: Even if one device stops working, the others can usually keep going.
  • Flexibility: New devices can be easily added to the network.

Common use:

CAN buses are widely used in cars, but they can also be found in many other applications, such as industrial automation and robotics.

Long Version

Recommended reading (external link):

https://www.csselectronics.com/pages/can-bus-simple-intro-tutorial

Why CAN in Astromechs?

It is very easy to add or remove modules without making major changes in the overall wiring of your astromech. You just need a bus of 4 wires:

  • Power
  • Ground
  • CAN-High
  • CAN-Low

This is totally sufficient for anything you want to do with your Astromech: Controlling servos, controlling lights, adding sensors… No need for 24 wire sliprings and stuff. 4 wires and you are done…

The AstroCAN-Series also allows you to connect classic modules like MarcDuinos or ShadowMD controller.

What is CAN-Termination?

In a CAN (Controller Area Network) system, termination refers to the use of resistors at the ends of the bus to absorb any reflected signals. These reflections can occur when electrical signals travel along the bus and encounter an impedance mismatch, such as an open circuit or a short circuit.

Why is CAN Bus Termination Necessary?

  • Signal Integrity: Without termination, reflected signals can interfere with the original signal, causing errors, data corruption, or even complete communication failure. Termination helps to damp these reflections and ensure the integrity of the transmitted data.
  • Noise Reduction: Reflections can introduce noise into the system, which can degrade the signal-to-noise ratio and make it difficult for the receiving nodes to correctly interpret the data. Termination helps to reduce this noise and improve the overall system performance.
  • Bus Stability: Termination helps to stabilize the bus and prevent oscillations that can occur in the absence of proper termination.

How Does CAN Bus Termination Work?

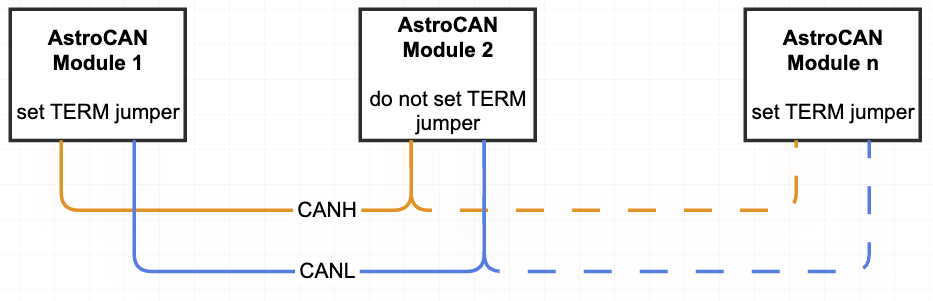
  • Resistors: Typically, resistors with a value of 120 ohms are used at each end of the bus. These resistors provide a load for the transmitted signal, absorbing any energy that is reflected back. Resistors are part of the AstroCAN modules and can be activated by jumpers.
  • Topology: CAN bus termination is typically used in linear topologies, where the nodes are connected in a series.
  • Other Considerations: The length of the bus, the data rate, and the number of nodes on the bus can also affect the termination requirements.

In Summary:

CAN bus termination is an essential technique for ensuring reliable and efficient communication in CAN networks. By absorbing reflected signals and reducing noise, termination helps to maintain signal integrity and prevent errors.
WiFi

Can WiFi, ESP-NOW and WiFi-Access point used simultaneousliy?

Yes, BUT: There are a few things you need to take into account if you want to use Wi-Fi to host a web server and use ESP-NOW simultaneously:

  • The ESP32 sender boards must use the same Wi-Fi channel of the receiver board.
  • The Wi-Fi channel of the receiver board is automatically assigned by your Wi-Fi router.
  • The Wi-Fi mode of the receiver board must be access point and station (WIFI_AP_STA).
  • AstroCAN automatically configures WiFi, NOW and AP to the same channel after factory reset. Only change manually if you exactly know, what you are doing.

Communication

What is “pairing” and why is it important?

“Paring” of modules is necessary to establish wireless communication via ESP-NOW. To avoid external interventions or even highjacking your controls, each module has to have knowledge about it’s communication partners. Stating the Espressif website, ESP-NOW is a “protocol developed by Espressif, which enables multiple devices to communicate with one another without using Wi-Fi. The protocol is similar to the low-power 2.4GHz wireless connectivity (…) . The pairing between devices is needed prior to their communication. After the pairing is done, the connection is safe and peer-to-peer, with no handshake being required.”

After pairing a module with each other, the connection is persistent. In other words, if suddenly one of your modules loses power or resets, when it restarts, it will automatically connect to its peer to continue the communication.

Although it is possible for the individual modules to communicate with each other, this option is not useful in most cases. Main communications is between the “brain”/shield in the body and each other module.

When using “automatic pairing” each module knows about the partners that are relevant and will store the MAC addresses. When using “manual paring” it is necessary, that the user has knowledge about the way the AstroCAN is designed to work.

How to pair modules?

See HowTo – Pair

How to wire up CAN modules?

Pretty easy: Power, GND, CAN-L, CAN-H. That’s it. Don’t swap CAN-H and CAN-L. Terminate first and last node on bus.

For specific connections, e.g. serial ports etc., take a look at the corresponding module page.

Sound

No sound or music is triggered, but sequences are running

The recent version of MarcDuino Firmware defines a different sound bank format. BetterDuino also uses this new format. Please check your SD-Card, the music files must be numbered as follows:

201 Beep Cantina
202 Star Wars
203 Imperial
204 Mana Mana
205 Cantina
206 Disco
207 R2 Star Wars
208 R2 Imperial
255 Startup Sound

How to connect the MP3-Sound module?

In standard Shadow-MD configurations the MP3-Trigger has to be connected to the Dome Master MarcDuino board. When connected to the Body Master you will be missing the sounds and music for the animation sequences.

There are some special boards like the AstroComm series from printed-droid.com, which also have a separate MarcDuino board for triggering sound from a body mount location: https://www.printed-droid.com/kb/astrocomms/

I’m using a DF-Player but don’t hear any sound…

Check, that the DF-Player is properly connected to the Dome Master! To hear any sound using a DF-Player, you have to use the BetterDuino replacement firmware (https://github.com/RealNobser/BetterDuinoFirmwareV4). Original MarcDuino firmware does not support DF-Player.
Also check, if you configured the Dome Master properly. Use “#MP01” to select DF-Mini-Player at Dome Master (Configuration parameters).
It must be configured at the Dome Master. N0t the Dome Slave or Body Master or any AstroCAN-Module.

Why can’t the BODY MarcDuino trigger Sequence-Sounds?

There are lots of sequences, that are only send to the Dome Master by ShadowMD. Within the Dome Master the corresponding actions are stored. Actions are: Lights, Servos, and… Sound!. It’s more or less by accident, that the standard random sounds also work when the MP3 trigger is connected to the Body Master. For a long time there was no Body Master. So all the actions are done by the Dome. This is by design and not an BetterDuino or AstroCAN issue.

Why doesn’t the BODY MarcDuino execute any command?

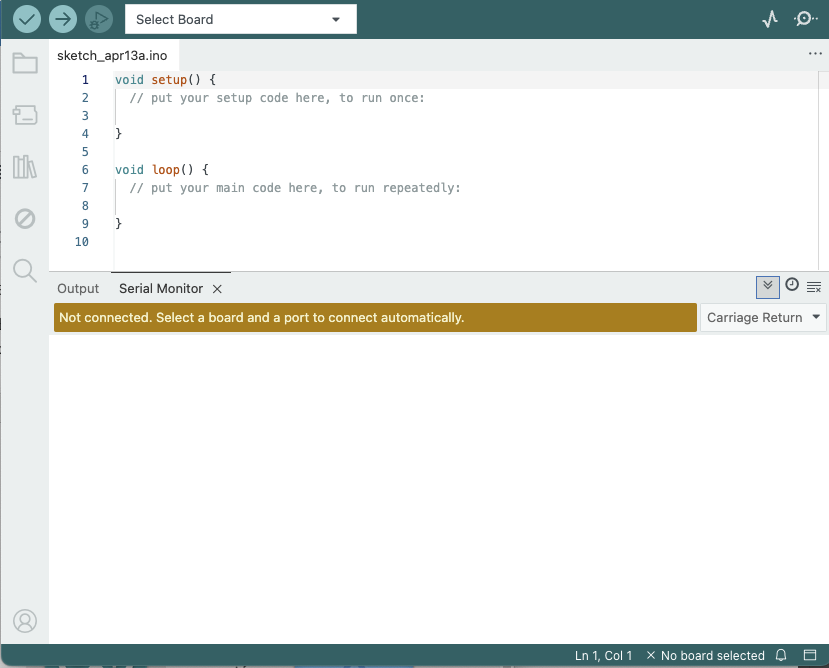
All MarcDuino (and BetterDuino) commands have to be send with Carriage Return as line ending, not Line Feed! So keep an eye on your terminal program configuration.

Most people are using the Arduino IDE serial monitor for testing. Please check the following settings on the right (“Carriage Return”):

Wiring

How to connect module …

AstroCAN Pro Dual Shield

AstroCAN Bridge